Installing carpet over a concrete floor can dramatically transform a room, adding warmth, comfort, soundproofing, and aesthetic appeal. Whether you’re updating a basement, converting a garage, or renovating a ground-floor space, carpeting over concrete is completely achievable with the right preparation.
This long, detailed guide will walk you through everything you need to know, from prepping your concrete subfloor to laying underlay and installing the carpet like a pro.
Why Carpet on Concrete Is Different
Concrete floors are durable, but they come with challenges such as:
- Moisture risk
- Uneven or cracked surfaces
- Coldness underfoot
- Adhesion difficulties
Installing carpet properly helps overcome these issues and ensures your flooring lasts for many years.
Tools & Materials You Will Need
Tools
- Utility knife
- Knee kicker
- Carpet stretcher (power stretcher recommended for best results)
- Hammer and nails
- Straight edge or metal ruler
- Stapler (for underlay edges only)
- Measuring tape
- Notched trowel (if using glue-down method)
- Chalk line
- Shop vacuum
Materials
- Carpet
- Carpet underlay (optional but recommended)
- Tack strips
- Carpet adhesive (for glue-down installations)
- Seaming tape (if joining pieces)
- Concrete sealant (moisture barrier)
- Filler/patch compound
- Carpet gripper rods
Step 1: Inspect the Concrete Floor
Before any installation begins, thoroughly inspect the concrete surface. Look for:
✔ Moisture
Concrete often absorbs moisture from the ground, especially in basements.
Test: Tape a plastic sheet to the floor for 24–48 hours. If condensation appears, you need a moisture barrier.
✔ Cracks
Minor cracks can be patched. Larger structural cracks may require professional assessment.
✔ Uneven Areas
Any dips or high spots can cause bumps under your carpet. Use a leveling compound where necessary.
Step 2: Clean and Prepare the Surface
A clean floor is essential for adhesion and a smooth finish.
Do the following:
- Sweep and vacuum the entire surface
- Remove paint, old glue, and debris
- Fill cracks or holes with concrete patch
- Sand down any high spots
A well-prepared floor ensures the carpet lays flat and lasts longer.
Step 3: Apply a Moisture Barrier (VERY Important)
Concrete naturally releases moisture, which can ruin carpet and underlay. Applying a moisture barrier prevents mold, odors, and carpet lifting.
Options include:
- Liquid concrete sealant
- 6 mil polyethylene sheet
- Vapor barrier underlay
Allow the sealant to dry completely before proceeding.
Step 4: Install Tack Strips Around the Room
Tack strips (gripper rods) hold the carpet in place. They are essential for a professional finish.
How to install them:
- Lay strips around the perimeter, leaving a gap of 6–10 mm (¼ inch) between the strip and the wall
- Make sure the pins face the wall
- Cut and fit strips around doorways, corners, and irregular shapes
- Use masonry nails or adhesive suitable for concrete
Tip: Wear gloves, those pins are sharp!
Step 5: Install the Underlay
Though optional, underlay makes a massive difference in comfort, insulation, and carpet lifespan, especially on cold concrete.
To install underlay:
- Roll out the underlay across the room
- Cut it to fit using a utility knife
- Lay it with the smooth side up
- Join pieces with underlay tape (do not overlap)
- Trim edges so the underlay fits neatly inside the tack strip perimeter
Do not staple underlay to concrete, use tape instead.
Step 6: Cut and Lay the Carpet
Now the fun part, laying the carpet.
Steps:
- Roll out the carpet in the room and allow it to acclimate for 1–2 hours
- Leave excess carpet along walls for trimming
- Use a straight edge to trim carefully for accuracy
Tip: Always leave extra material rather than cutting too short.
Step 7: Join Seams (If Needed)
If the room requires more than one piece of carpet:
To seam carpet:
- Align the pattern (if applicable)
- Cut edges cleanly with a straight edge
- Use seaming tape and a seaming iron
- Press the seam together for a tight bond
This step requires patience, rushed seams are very noticeable.
Step 8: Stretch the Carpet
For a professional finish, the carpet must be stretched.
Using a Knee Kicker
- Start along one wall
- Hook carpet onto tack strips
- Work your way around the room
Using a Power Stretcher (Highly Recommended)
- Place it across the room
- Push to stretch the carpet tightly
- This prevents wrinkles and future loosening
Professional installers almost always use power stretchers for best results.
Step 9: Trim Excess Carpet
Once the carpet is secured:
- Use a sharp utility knife
- Trim excess along the wall-edge
- Push carpet neatly down between the tack strip and wall using a carpet tucker or putty knife
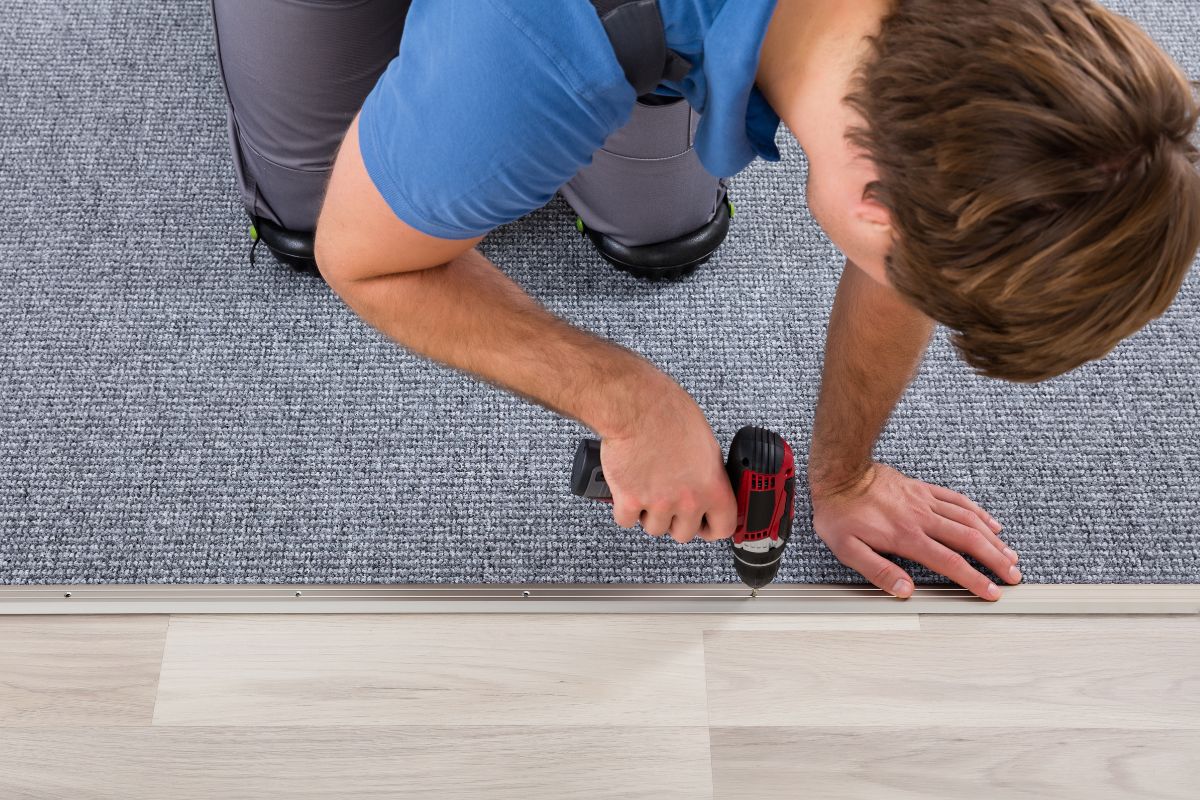
Step 10: Install Door Bars and Finish Up
Finally, finish the edges and transitions:
- Fit door bars where carpet meets other flooring
- Vacuum thoroughly
- Inspect for any loose edges or bumps
- Walk through the room to check for firmness
Your carpet installation is now complete!
Glue-Down Method (Alternative Installation)
Some concrete areas, especially basements or commercial spaces, may require a full glue-down application.
How it works:
- Spread adhesive using a notched trowel
- Lay carpet directly into the adhesive
- Smooth and roll using a carpet roller
- Allow proper drying time before walking on it
This method provides strong adhesion but is more permanent and harder to replace.
Common Mistakes to Avoid
❌ Installing carpet directly on damp concrete
❌ Skipping the underlay
❌ Not using a moisture barrier
❌ Cutting the carpet too short
❌ Failing to stretch the carpet
❌ Overlooking floor leveling issues
Maintenance Tips for Carpet on Concrete
- Use a dehumidifier in basements
- Vacuum regularly
- Clean spills immediately to prevent mold
- Have the carpet professionally cleaned yearly
- Maintain your moisture barrier if you notice dampness
Final Thoughts
Installing carpet on concrete is entirely achievable, even for DIY beginners as long as you take the time to properly prepare the floor and use the right tools. With careful installation, your carpet will feel soft, warm, and luxurious, transforming an otherwise cold concrete space into a cozy living area.